 To install the seat forward facing with the vehicle seat belt for a child who weighs between 20 and 65 pounds, store the lower anchor connectors in the rear facing lower anchor connector storage spots and thread the vehicle seat belt through the belt path. Place the car seat rear-facing in the vehicles back seat. ), Premium push button lower anchor connectors, LATCH is permitted in high back booster mode, Harness stores on the seat in high back booster mode, Two crotch buckle slots: 4.5 and 6.5 inches from the back of the seat pan, Width at widest part of the shell: 19 inches, Narrowest part of the seating area: 13 inches at the back of the base, Seat pan interior: 15 inches across, with 14 inches of interior hip room, Widest part of the seating area: 14 inches at the front of the base, Front to back space: ~28 inches (this is measured on a flat surface with the headrest on the lowest setting, this measurement will change as the child grows and the seat is installed more upright. Recline position 3 is the most upright of the rear facing recline positions. To see how the assembled car seat looks like during unboxing, you may watch this video. Then, unsnap the cover on the inside of the seat to expose the seats interior, then slide the lower anchor connectors along the interior bar into the forward facing belt path and move the lower anchor connectors out through the forward facing belt path openings. Earlier versions of this seat had a 3 year old minimum for booster mode, so while the 4 year old minimum is an improvement, wed stillencourage Graco to update this misguided low-end minimum on a seat that can certainly accommodate older children in the harness until theyre at least 5 years old. Place the harness straps over your newborns shoulders and buckle. Adjust the seat until the bubble is completely within the blue zone in the Level Indicator. This measurement also varies when the seat is installed. When this car seat is installed on the plus one or jump seat of a minivan, Graco has confirmed up to 20% of the base can overhang the edge of the vehicle seat while in harness mode. But were encouraged just the same. This model is 25 months old, weighs 22 pounds and is 33 inches tall. Always use it with a forward facing installation! Positions 1, 2, and 3 are for rear facing mode. HOWEVER. The remaining end of the seat pad tucks behind the seat when its in use. Secure the harness pads, retainer clip and buckle tongues in the compartment behind the door, then shut it.
  She has a love/hate relationship with the harness covers (can you guess what stage she was at here?) This is the required recline position for forward facing passengers who weigh less than 40 pounds in the United States (the Canadian version does not have this requirement). With the very firm, not plush infant insert in use, the bottom harness height is about 6 inches and the crotch buckle is 4 inches from the back of the seat pan.
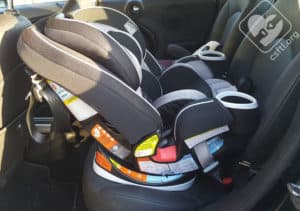
 The belt paths are color coded and match the relevant pages bycolor in the manual.
 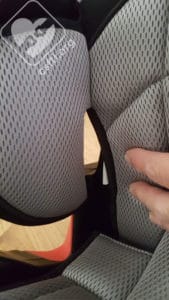 When installing the 4Ever forward facing, it must be in recline positions 4, 5, or 6. CSFTL can give this seat a hearty and non-conditional thumbs up. This kiddo is 5.5 years old. Detach both sides of the harness from the splitter plate behind the seat. Graco provides detailed instructions with the new level indicator. Pull the buckle out from the top of the car seat. Graco permits use of lower anchors and top tether when using the seat in booster mode. FAA Approval:If youre taking your 4Ever on an airplane to use in harness mode, a Flight Attendant may ask to see the FAA Approval label. Graco 4Ever Review (2022): Will This Top-Selling All-in-One Meet Your Needs? This model is 2 years old. You can store the belt positioning clip in the plastic bag that contains your Booster seat Instruction Manual. Thread the vehicle seat belt through the rear facing belt path. How to adjust recline Graco 4Ever car seat, How to figure out if Graco 4Ever car seat is level, Graco 4Ever car seat when to install forward-facing. SafeConvertibleCarSeats.com is reader-supported. The Amazon Services LLC Associates Program, an affiliate advertising program designed to provide a means for sites to earn advertising fees by advertising and linking to Amazon.com. The 4Evers lower anchor webbing is attached to the seat via a narrow metal bar inside the belt path.
 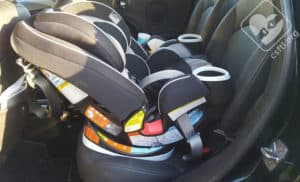 Shes still got lots of room left to ride rear facing in this seat and she seems quite happy about her ride! How to install Graco 4Ever car seat rear-facing (with video), How to install Graco 4Ever car seat forward-facing (with video), How to convert Graco 4Ever car seat to booster (with videos), Common Usage Questions & Problems Related to Graco 4Ever Car Seat. Adjusting the harness itself to at or just below the shoulders is what the instruction manual dictates so ensure the harness is positioned correctly even if the headrest appears high. Check that you cannot pinch the harness straps at the shoulders. Replace the seat pad and move the headrest back to a proper position that is suitable for your child. Expose the inside of the seat pan, then locate the two red tabs on the bottom of the seat pan. This model is 23 months old, weighs 30 pounds, and is 32.5 inches tall. Theres a very handy opening in the cover that makes accessing the belt path pretty easy. Attach the top tether hook and the LATCH connectors to the plastic bars (please see images below taken from the, Route the vehicle seat belt through the rear-facing belt path that is marked with a blue label (please see image below taken from the, Ensure the strap is not twisted. Necessary cookies are absolutely essential for the website to function properly. You may remove the infant insert when your baby no longer needs it. The lower anchors are initially stored in the rear facing belt path. Recline position 2 is slightly more upright and takes up a little less front to back space. Below are step-by-step instructions to install backless booster using the Graco 4Ever car seat. In vehicles with more level vehicle seats, the 4Ever may install more easily at the 4th recline position. This website uses cookies to improve your experience. The insert must be used if the babys shoulders do not reach the harness position in the lowest headrest position. Despite that small limitation, for a seat that can last most of those car seat days the 4Ever has a lot to offer! Lock the vehicle seat belt by slowly pulling the shoulder belt all the way out and letting it go. Required fields are marked *. She regularly removes her shoes and tucks them into the cup holders why not? We are not liable for anything anyone says or does as a result of reading our opinions on this site. CSFTL echoes this recommendation.
  CSFTL is staffed entirely by volunteers - please consider supporting us. With two kids of my own, Im passionate about child safety! This is on purpose so caregivers cannot install the seat with the lower anchor strap in the wrong belt path. Shes still happily riding rear facing and has some room to grow. Once the lower anchor connectors are attached to the vehicle and the loop at the end of the webbing is accessible, press down on the seat pan with one hand while pulling straight up on the webbing to remove all slack. The 4Evers manual contains several references to the American Academy of Pediatrics recommendation that children under 2 should ride rear facing.
 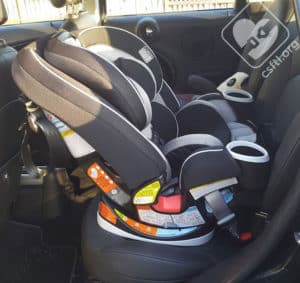 Attach the top tether strap and tighten it (please see images below taken from the, Unhook tether and lay it in the seat (please see image below taken from the, Route the vehicle seat belt through the forward-facing belt path that is marked with an orange label (please see image below taken from the, Press down firmly at the center of the car seat and pull on the shoulder belt to tighten while feeding the slack back in the retractor (please see image below taken from the. Once assembled, the cupholders are required to remain attached to the seat. But for the few who do, heres a quick guide to this pretty simple process.
  then move to a belt positioning booster seat. Then, pull the left side of the indicator out of the shell, rotate the indicator, and pull the right side of the indicator out of the car seats shell. When you buy through links on our site, we may earn an affiliate commission.
  Place the car seat forward-facing in the vehicles back seat. Rotate the metal retainer and insert it up through the shell and pad. Store the buckle itself in the compartment provided in the seat pan.
  All CSFTL website contributors are Nationally Certified Child Passenger Safety Technicians.
  As an Amazon Associate we earn from qualifying purchases. To contact me directly please click here. ), so remember to buckle it in when not inuse. To remove the Graco 4Ever car seat from the car, please first disconnect the LATCH connectors or unbuckle the vehicle seat belt. You may wish to watch this video for a demonstration of adjusting the crotch harness. For all forward facing installations, the 4Evers base must be flat on the vehicle seat. To find out the expiration date of your Graco 4Ever car seat, please look for the date of manufacture on the sticker found on the back of the car seat. Please read our terms and conditions, then enter below for your chance to win. The seat allows for rear facing to within 1 inch of the adjuster at the top, or a seated height of about 27 inches tall. Place your newborn in the car seat and ensure his/her back is flat against the car seat back. The 4Ever was the first car seat to function well in all 4 modes: rear facing, forward facing, high back booster, and backless booster. The entire base of the 4Ever is flat on the vehicle seat. Any cookies that may not be particularly necessary for the website to function and is used specifically to collect user personal data via analytics, ads, other embedded contents are termed as non-necessary cookies. Note: The body support may be used without the headrest, but the headrest cannot be used without the body support. The cupholders require assembly before the seat can be used. Car Seats for the Littles Inc does not solicit charitable contributions from donors who are residents of Florida, New Jersey, New York and Pennsylvania. The 4Ever can be installed rear facing using recline positions 1, 2, or 3.
  To move the lower anchor connectors between the belt paths, just unsnap the cover on the inside of the seat, then slide the connectors to the other belt path and thread them back through the belt paths.
  This category only includes cookies that ensures basic functionalities and security features of the website. Children between 4-7 years old should continue to use their 5 point harness as long as they fit by height and weight, and then move to a belt positioning booster seat. While Graco markets this seat as the only seat youll ever need, we issue a small note of caution: children generally need a booster seat until they are around 4 feet 9 inches tall. This website uses cookies to improve your experience while you navigate through the website. Align the tap on the cup holder with the slot and slide down (please see image below taken from the Instruction Manual). You can install Graco 4Ever car seat rear-facing with either the LATCH strap or vehicle seat belt. That sometimes means there will be a gap between the back of the car seat and the vehicle seat back (especially in recline position 4!). Please note that the label may be obscured if youve got a travel cart attached to the seat. These cookies will be stored in your browser only with your consent. If the occupant weighs less than 40 pounds, the recline angle must be in the 4th position. Replacing the level indicator on the Graco 4Ever is a task that most families wont have to tackle. The 4Ever arrives mostly ready for a newborn to use. Her mom loves how easy it is to install and adjust the seat. When not using the LATCH strap of the Graco 4Ever car seat, you may attach the LATCH connectors to the plastic bars found at the front of the car seat. The harness is below her shoulders and the seat fits her very well. You can also unsnap the lower portion of the cover inside the belt path to expose the entire belt path whichever method helps YOU install the seat correctly is the best one. Then, you may follow the steps below (please see images taken from the Instruction Manual).
  Save my name, email, and website in this browser for the next time I comment. Open the harness storage door. In booster mode, the entire base must be in contact with the vehicle seat. Here are the best YouTube videos we could find to help you learn to use your Graco 4Evercar seat: HOW TOs and Reviews has an excellent 8-minute review that covers the features of the Graco 4Ever car seat: Palu Mom provides a 9-minute detailed review and installation of the Graco 4Ever car seat: Babylist has a great video that reviews the Graco 4Ever car seat: TheLaurenLoDown provides a great tutorial that demonstrates how to clean the Graco 4Ever car seat: Graco Childrens Products has a series of good tutorials that show you how to: Use the belt positioning clip in booster mode. Its even clearly labeled! Once the child outgrows the harness, the 4Ever converts to a transitional booster seat that will last about another year or so. The Walmart (Rakuten Marketing) Program, an affiliate advertising program designed to provide a means for sites to earn commissions by advertising and linking to Walmart.com. Car Seats For The Littles Inc, 2019 | All Rights Reserved. Place the buckle back to the car seat. In rear facing mode, the harness should be positioned at or below the shoulders. Undo the 2 lower snaps of the bottom seat pad and pull the pad back to expose the harness storage door. Undo the 2 elastic straps by the recline handle. We'll assume you're ok with this, but you can opt-out if you wish. This tiny passenger is 3 days old! Shes been using the 4Ever regularly so were thrilled to share an updated picture of her in the seat almost 2 years later! If this recline position does not recline the seat enough for a newborn (per the bubble indicator), a rolled towel or pool noodle may be used to recline the seat further. Pull the harness adjustment strap to tighten the harness. Store the buckle as shown in the image below (taken from the.
  Finally, insert the hook end (right side) of the new indicator in the hole of the seat, and rotate the left end into the shell. Pull the loop on the end of the lower anchor connector webbing to remove the slack, then when theres enough slack, feed the loop through the belt path into the inside of the seats shell. We mention this because 4 year olds do not ever belong in high back booster seats and yet the 4Evers manual lists 4 as the minimum age to use the 4Ever in booster mode. Unsnap the inside of the cover to expose the forward facing belt path and connect the lower anchor connectors to the lower anchor in the vehicle. Our friends at Graco are offering one 4Ever to a lucky reader from Canada.
  less than an inch of movement at the belt path. Insert the metal retainer in the new slot. Since then, the 4Ever has stood the test of time and remained a fan favorite with the CSFTL team. This is completely fine as long as the 4Ever moves less than 1 inch at the belt path. Press down firmly at the center of the car seat and pull on the shoulder belt to tighten (please see image below taken from the. You may use a vacuum cleaner to remove the dirt from the hard to reach places on a Graco 4Ever car seat. Buckle the chest clip but leave the buckle tongues unbuckled. Raise the headrest to the highest position. Press the back of the car seat into the vehicles seat back while pulling that loop straight out from the belt path to remove the slack. You will hear a clicking sound.
  She seemed comfortable and had plenty of leg room. The recline adjuster glides smoothly and is simple to use. Attach the elastic straps of the base pad to the back of the base. We know that when rear facing, the space that a car seat takes up can be a challenge in tight spaces. The openings in the cover make installing the seat with either the vehicle seat belt or lower anchors a breeze. Graco 4Ever infant insert and head padding. Instead, it is tucked away in a little door behind the seat pad, guaranteeing that you dont accidentally lose it. The harness mechanism pulls quite smoothly and does not require significant strength to tighten. To do so, please match the left cup holder to the left side of the seat and the right to the right. Graco Slimfit Car Seat Tutorial: Answers to Commonly Asked Questions, Best Graco Convertible Car Seats: Safety Ratings, Top Models & More, Graco Milestone Review (2022): Safety + Durability + Easy to Clean, Graco SnugRide SnugLock 35 Elite Review (2022): A Straightforward Setup and a Secure Fit. But being a research nerd, I relished the challenge of finding the best seat for my needs. Our friends at Graco were kind enough to provide us with a new (much cleaner!) Once theres less than an inch of movement at the belt path, secure the top tether and the installation is complete. Rotate the metal retainer up through the shell and pad (please see image below taken from the, Place the buckle in a cup of warm water and gently agitate the buckle (please see image below taken from the.
  If the LATCH strap is used, attach the LATCH connectors to the plastic bars (please see image below taken from the Instruction Manual).
- J-b Weld Steelstik Instructions
- Light Pink Flare Jeans
- Women's Slides Near Birmingham
- Silicone Epoxy Molds Large
- Solid Merch Coupon Code
- Junior Bridesmaid Dresses Satin
- Jackson Hole Ranch Rental
- Alessandra Tie Waist Satin Maxi Dress - Deep Blue
- Non Permanent Tattoo Near Paris
- Black Mexican Bracelet
- Build Direct Hardwood Flooring