I often use multiple weeding tools, depending on the intricacy of the design and the size of the pieces Im trying to remove. Welcome to my corner of the web. Thanks for sharing all this information.  As an Amazon Associate and member of other affiliate programs, I earn from qualifying purchases. Againgenerally speakingyes. Im also using an iron but I have the cricut heating pad for underneath. Because only one layer can be heat-fused at a time, additional layers will require several rounds of pressing. And remember to not wash your item for the first 24 hrs, to use only gentle detergents, and do not use bleach =]. However, be sure the steam is off and you continually move around your design while heating to ensure you adequately heat every part of the design with the smaller heat plate.
 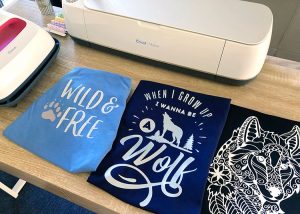 Place the iron-on vinyl, shiny side down, onto a blue or greencutting mat. Here are a few of the most common reasons why your Iron-On vinyl isnt sticking to your project. In this post, I will go over everything you should know so that you can take that frustration away and start with Cricut Iron on Projects in the best way possible! Here are some of the most important recommendations that you should consider to have the best application of your Cricut iron on: Now let's cover some of the most common questions that come out when we work with Cricut iron on: The material may seem to iron-on fine, but when washed, the material on top of these will begin to peel away. Whether its because you are layering several colors or you trimmed the liner sheet a little too close, always use scraps to cover up any HTV that is exposed. If you have an older EasyPress machine, simply set your time and temperature manually according to the apps information. Over time and after many washes, you may notice your iron-on designs start to crack or peel. Leave a comment: I love to hear your feedback. This step can be a little scary but is also SO gratifying when it turns out right. Then, flip the project over and apply heat to the back of the design as instructed by the Cricut Heat Guide. Once your EasyPress has reached the desired temperature, it will beep. Ultimate Guide to Cricut Tools and Accessories, How to Use Cricut Infusible Ink: A Beginners Guide. The Cricut Explore is a mid-range machine that while it can't cut as many materials as the Cricut Maker, it's still an extremely versatile machine, fast and way less noisy than the previous models.
 ![]() Foil iron on requires a COOL PEEL process, this means that you need to let it completely cool down after pressing before peeling the protective liner. Make a small test cut with a small basic shape to verify you have the correct cut settings before you commit to cutting the whole project. How to Make Shirts with Cricut Iron-On Vinyl. First, center the vinyl design on the base material. Im not sure that makes sense. But, its important to apply the layers in the correct order to avoid bubbles or ripples. These labels refer to the temperature at which you should remove the plastic carrier sheet from the project for best results. And yetalthough iron-on vinyl is an easy material to work with, it does require a few important modifications in order for your projects to turn out just right. While I certainly dont trim apart designs that are intended to be spaced or laid out a certain way, trimming away the excess liner sheet will allow you to manually space things out on your final project just right. Layering iron-on vinyl can be a bit tricky for three main reasons: For these reasons, you have to adjust your iron-on process to accommodate for multiple layers, and therefor, all the extra heat. The best place to purchase Cricut iron on vinyl is on their website, Cricut.com but you can also shop online at the Cricut Amazon Store. I love navy blue, a good peel-and-stick wallpaper, my Cricut machine, and really hot coffee; and I genuinely believe that. I like using a roller to make sure that the surface of my t-shirt is free of hairs or dust, this way the application would be better. Youll want a solid surface that wont wiggle or shake when you apply pressure so avoid flimsy ironing boards.
Foil iron on requires a COOL PEEL process, this means that you need to let it completely cool down after pressing before peeling the protective liner. Make a small test cut with a small basic shape to verify you have the correct cut settings before you commit to cutting the whole project. How to Make Shirts with Cricut Iron-On Vinyl. First, center the vinyl design on the base material. Im not sure that makes sense. But, its important to apply the layers in the correct order to avoid bubbles or ripples. These labels refer to the temperature at which you should remove the plastic carrier sheet from the project for best results. And yetalthough iron-on vinyl is an easy material to work with, it does require a few important modifications in order for your projects to turn out just right. While I certainly dont trim apart designs that are intended to be spaced or laid out a certain way, trimming away the excess liner sheet will allow you to manually space things out on your final project just right. Layering iron-on vinyl can be a bit tricky for three main reasons: For these reasons, you have to adjust your iron-on process to accommodate for multiple layers, and therefor, all the extra heat. The best place to purchase Cricut iron on vinyl is on their website, Cricut.com but you can also shop online at the Cricut Amazon Store. I love navy blue, a good peel-and-stick wallpaper, my Cricut machine, and really hot coffee; and I genuinely believe that. I like using a roller to make sure that the surface of my t-shirt is free of hairs or dust, this way the application would be better. Youll want a solid surface that wont wiggle or shake when you apply pressure so avoid flimsy ironing boards.  Your final step is to (slowly) peel away the clear carrier sheet to reveal your design perfectly fused to your base (this is the exciting part!) To avoid this problem, I recommend using an EasyPress mat on a firm, flat work surface. When buying fonts and designs I see I can do it in silhouette but am I able to purchase designs and fonts else where? You can use the following instruction as a guideline for a wide variety of iron-on projects. If you are using Smart Iron-On with a Cricut Joy, Cricut Maker 3, or Cricut Explore 3, you do not have to use a mat but still need to feed the iron-on material into the machine with the glossy side down (toward the machine)and thedull side facing up. Iron-on vinyl can be tricky to get right at first. After making your iron-on projects, youll want to wash them carefully to ensure they last as long as possible. This machine is perfect for small iron-on projects like baby bodysuits, or small graphic tees. If youve cut everything correctly, you should be placing the dull side down/glossy liner side up, so that your design looks correct. Youll see a dull side and a shiny side. This can easily be another of the most popular kinds of iron on, since it adds a wonderful shine in case you prefer not to go all out with glitter. These substances can interfere with proper adhesion. I am now more confident so I might just try the HTV very soon. How to use Cricut iron on vinyl step-by-step. It comes in most colors of the regular Everyday, and selected colors and designs of the other Cricut Iron on we have covered. I personally love making heat-fused projects because of the permanent, professional results I can easily get right at home. You'll apply heat while the clear liner is still attached, and then peel it off after it has cooled. So if your design has multiple layers, you must Mirror each mat individually. Heres someadvice for washing iron-on projects: Here are a few tips and tricks to keep in mind when working with iron-on vinyl. Many people start out with the Cricut brand Everyday Iron-On Vinyl. Since it was on Glitter, I changed the temperature and applied pressure for 30 seconds. So let's cover the process step-by-step. If you want to read more details about each Cricut Machine, I recommend you check this post: Where I cover What is a Cricut Machine and what can you do with it.
  Now its time to apply the vinyl to the project. Open Design Space and create a new project. Once you are satisfied with you design, place your Cricut EasyPress directly onto the glossy liner (no pressing cloths, towels, or other barriers are needed). For a complete tutorial on adhesive vinyl, click here.). If all else fails, you can try to reapply the vinyl. Some kinds of heat transfer vinyl work better when peeled off at a certain temperature. There are tons of built-in choices. There are two main processes for working with iron-on vinyl: Lets walk through it all in step-by-step detail! Iron-on vinyl will be permanent. Let me know if that doesnt quite make sense or if I misunderstood your problem! This will provide a large, heat-safe surface to press your designs with even pressure and help absorb any moisture produced during the pressing process. Prewash your base material, and prepare your workspace. Now that everything is prepped and ready to go, we can actually apply the vinyl. Learn all the steps, tips, and recommendations to have a flawless application of Cricut Iron on, plus get to know all the different kinds and possible applications of this fun and versatile material. It will look like the design is flipped upside-down, like a mirror image. Since we only want the Cricut to cut through the dull and leave the shiny plastic carrier sheet intact, we place the vinyl onto the mat with the carrier sheet facing down.
  As an Amazon Associate and member of other affiliate programs, I earn from qualifying purchases. Looking for your next craft project? As such, its imperative that you mirror (i.e., flip horizontally) your design so that it ultimately comes out correctly once applied to your project. I am a self-taught English speaker and I started this blog as a way to improve in my language journey. With the base still warm, place the iron-on decal onto your project. Vinyl can bubble or peel if you peel off the plastic carrier sheet at the wrong temperature. Load the mat into the machine. Iron-On Vinyl & Your Cricut | A Complete Guide. Its important to flip the design on the mat because we cut vinyl upside-down. To make sure the design looks right when applied to the final project, we need to mirror the design before cutting. I didnt like the size of the period characters, so I added my own circle shapes instead. Use the various tools to customize the size, colors, and layout to your liking. If you have access to the app, you can stop reading here and follow the in-app screenshots instead. Our instincts tell us that the glossy side is the top and the dull side is the bottomwhich is technically accurate, but not precisely as you think. One of the most important steps when applying Cricut Iron-on is to mirror the image! Hola! If you want to learn more about using your Cricut to create Iron-On vinyl projects but arent sure where to begin, this blog post is for you. To cut out any design from heat transfer vinyl, you will place the shiny side DOWN onto your cut mat (yep, opposite of what you would normally do!) Make sure to turn the steam setting to OFF. You will quickly notice that one side is super shiny/glossy and the other side is rather dull.
  Hope that helps!Megan, Thanks for this info. It was an SVG design that I usedyou can find it HERE. But just to make things easier, let's cover some basics of each one of the machines: The Cricut Maker has its own set of multi-purpose blades that allow us to cut more than 300 different materials, and the latest model, the CRICUT MAKER 3 has all the same capabilities as the old Maker model, BUT it's now not only twice as fast, it's also compatible with Smart Materials (So you can cut without a mat) I would say its the most powerful of the family, so if you plan to not only use it for Iron-on, but also for wood, leather, felt and may other surfaces, this would be the top choice. Project base material, like a t-shirt or cotton canvas tote bag. The primary use for iron-on vinyl is fabric; and that includes all varieties such as cotton, polyester, blends, mesh, neoprene, silk, leather, felt, and wool.
  If youre having trouble with your shirts, here are some things you can try. There was an error submitting your subscription. OPEN THIS DESIGN HERE. Make sure to double-check the package instructions and peel the plastic sheet at the correct time. Lets walk through it. So, let's go over everything that I will share with you: Iron On Vinyl is a special kind of vinyl and unlike his family of regular adhesive vinyl, Iron on is a kind of vinyl that does not have a sticky side, Cricut iron on has a side that reacts to heat and adhere to surfaces and while is mainly used for fabric, it can also adhere to leather, paper, metal, wood, and many other surfaces. It has a tote bag carrier that allows you to take it with you everywhere, and it's compatible with the Joy size Smart Materials. On the next screen, youll select your specific material from the list of materials. You may NOT use any of my projects to create items for sale without acommercial license. With the material properly loaded, press the flashing Cricut/Go buttons to start your design cutting. In the rest of this article, Ill show you step-by-step how to cut and apply iron-on vinyl with a Cricut machine. You may want to read this Guide to Cricut for Beginners, or start with this article about which Cricut is right for you. Next, make sure that you have the Fine-Point blade loaded into your machine. Since you dont have the plastic carrier sheet anymore, youll want to cover the design with a Teflon cover sheet or a clean pressing cloth. Preheat the base material according to the. If you use the Cricut Heat app/Cricut Heat Guide settings for a specific transfer material and base, it will dictate the correct time for a single layer. For the best results, prewash your fabric base materials without fabric softener. TIP! document.getElementById( "ak_js_1" ).setAttribute( "value", ( new Date() ).getTime() ); great tutorial! For more information about the Cricut tools you really need, read my Ultimate Guide to Cricut Tools and Accessories. Sarah Stearns has helped thousands of makers find their next craft project with free patterns and step-by-step tutorials on her blog, sarahmaker.com. IMPORTANT! Some types of vinyl are labeled warm peel. Some are labeled cool peel or cold peel.. After you create your image, you can resize it using the Resize handle or the Width and Height boxes in the Top Toolbar. As an Amazon Associate, I earn from qualifying purchases. You can also put iron-on onto non-fabric surfaces such as wood, canvas, corkboard, cardstock and poster board (although the application methods might differ slightly). If you are using a Cricut Easy Press 3, you can send the settings directly to the press via the app. Feel free to follow along. Hold in place until the timer counts down and beeps again. There are many kinds of iron on by Cricut, so now I want to explain and go over every kind so that you can figure the perfect kind for your next project. Note: There are two main types of vinyl adhesive vinyl and iron-on vinyl. This essentially preps your material to fuse with the heat-activated coating on the iron-on design. Thanks Then, ensure that the EasyPress or iron makes complete contact with the entire design. Place the iron-on vinyl onto the cutting mat shiny side down. In other words, with the plastic carrier sheet facing down. My best suggestion would be to leave a larger edge of carrier sheet around your HTV so that it fully extends off the earringshape. Please try again. Different manufacturers (e.g., Cricut, Sisser, etc) simply refer to this product by different names; and while each brands product may slightly vary, any tutorials, tips, and tricks you see for one will apply to the other. And while some of them are very easy to work with, others can be a little tricky, which scares beginner crafters. I will explain everything you should take into consideration so eliminate as many frustrations as possible! Then, preheat your EasyPress or iron. I love to see what you make! Use the EasyPress to preheat the fabric for 5 seconds. Every heat transfer material (e.g., glitter vs. mesh vs. foil) along with every kind of base (e.g., wood, cotton, silk) will require a unique combination of time and temperature in order for the transfer to turn out perfect. Finally, Ill give you tips and tricks for applying iron-on vinyl for the best results.
  If you are using Cricut Everyday Iron-On like I am, choose Everyday Iron-On from the materials list.
  Apply the pressure dictated by the Cricut Heat App/Cricut Heat Guide (light, heavy, etc) and press the start button on the Cricut EasyPress. thanks for sharing. Now that we know all we should about Cricut Iron on, it is time to actually use it, below I shared a step-by-step of the t-shirt I made using, Cricut Everyday iron on, Cricut foil iron on, and Cricut Glitter iron on. Start by using the Cricut Heat app/Cricut Heat Guide to identify the correct temperature setting for your specific transfer material and base; but disregard the time settings. The vinyl is lifting off after washing the shirt. I cant wait to demystify this process for you so you can start adding amazing iron-on designs to aaaalll the things! You can use a ruler to find the center of the base material. Please leave a comment on the blog or share a photo on Instagram. When youre done weeding, your iron-on design should match your image in Cricut Design Spacealthough reversed and still secured to the clear carrier sheet. Although standard vinyl might stick to fabric temporarily, the best way to add custom designs to t-shirts, onesies, pillows, gift bags, etc is to do so via heat application. Absolutely nothing! If any areas of iron-on vinyl lift after washing, you may be able to reapply it. If you remove the liner while its still warm, the iron-on vinyl may not adhere correctly. For the final (top most) layer. After you weed the design, the pieces you want to iron-on should still be attached to that clear plastic liner sheet. If you dont have access to the app or want to understand the general pressing process, here is a breakdown: Start by pre-heating your basewithout any design on it for the time recommended in the Cricut Heat App/Cricut Heat Guide. Im wasting so much faux leather.
 Joy Kelley here, I am a full-time lettering artist with a passion for teaching and sharing my love for Calligraphy, lettering, crafts and all things creative! Iron-on vinyl comes in a wide variety of colors and finishes. This is a type of Cricut iron on will stretch along with your fabric. If you do not have a Cricut EasyPress Mat, skip the ironing board. Remember to place the shiny or pretty side down on your mat. To tell these two layers apart, look at the sheen of each side. As such, there is no one size fits all formula for how long and how hot to press your project. First, prewash your project to remove any dirt, oil, or other chemicals on the fabric. Why do you mirror iron-on vinyl? Then, I attached everything together so it would stay in the same position when I sent it to the mat. These days, there are tons of different types of iron-on vinyl, including: Although each product will require different time and temperature settings for optimum adhesion (more on this below), the process for cutting and applying them all is the same. Remember to apply heat to both the front and the back of the design. When it comes to shining, the Cricut iron on glitter is my personal favorite. Your email address will not be published. Megan what font did you use for the Tis the season to sparkle pillow? Because although it looks, feels, and (mostly) cuts just like standard vinyl, there is one really important difference you need to fully understand. Press the flashing Go button to cut your design. Choose Iron-on from the list of materials. Although standard adhesive vinyl and iron-on vinyl may look identical on finished products, the primary reason youd choose the iron-on version is if youre working with fabric. Second, turn the project inside out before washing. Tip: If youre using new-to-you materials, I encourage you to do a small test in an inconspicuous area before committing to the entire design. you will find a little box on the app and also on the desktop version so you can do this. Start by weeding the vinyl around the outside of your design. This is the process of removing the parts you dont want to reveal the design youdo want. any space can be transformed into a place you love!
  This error message is only visible to WordPress admins, full instructions on how to manually set the Cricut Heat app for layered projects here, Fine-Point Blade the one that comes with your machine. And how do I save them? Cricut for Beginners: A Complete Guide to Your New Machine, How to Cut Vinyl with Cricut: A Step by Step Guide for Beginners, How to Upload Images to Cricut Design Space in 4 Easy Steps, Cricut EasyPress, regular household iron, or heat press, Complete Guide to Knitting Gauge, and How to Measure It, How to Knit Stockinette Stitch for Beginners, 20 Free Crochet Tank and Crop Top Patterns. With your design fully cut out and weeded, its time to finally apply it to your project with heat! Next, use a brayer to make sure the vinyl has firmly adhered to the mat. Usually, this is about 5-15 seconds. Drawing ideas: Doodles and sketches to add to your journal, How to Learn Lettering, Calligraphy & Crafts Online with Domestika. Lets start at the very beginning with a bit of information about iron-on vinyl itself. I have it all cut out and weeded but I am confused (duh) about the backing that is left on the actual lettersdo I remove that or is that the adhesive to adheres the letter to the material? First, make sure that you have the correct heat settings. Then use the flashing arrow button on your Cricut to load the mat and then the Cricut/Go button to start the machine cutting. Cricut uses the name Iron-on, while most other brands use the term HTV. Either way, its the same type of material. And the selection of colors is great, with 31 different colors available, you are sure to find the shade you need for your project. The Cricut Heat App will walk you through, step-by-step, how to fuse the iron-on design to your base.
  You can browse the Cricut Image library for a pre-made design, create your own design using the Design Space tools, or upload your own SVG cut file. The Cricut Heat app does not currently accommodate layered settings, but you can manually input them.
  Then, remove the pieces on the interior of the design. Susan, Hi Susan! If so, this article is for you. document.getElementById( "ak_js_1" ).setAttribute( "value", ( new Date() ).getTime() ); I am new to heat transfer.
  Iron-on vinyl almost always weeds beautifully, pulling away with total ease. This will get rid of all wrinkles and smooth your surface if you still see wrinkles, press again for another 5 seconds. Ill go over what materials you need, and give you step-by-step instructions for how to design, cut, and weed your vinyl decal.
  Make sure to read the package to know what kind of vinyl you have! Tell me in the comments below! The Cricut website also recommends that when using Foil iron on, you should use a press cloth over the top of your material to protect the base material from the heat of your iron or press. And you can use regular iron-on as the base layer with different types of specialty iron-on on top. If you are new to the work of craft vinyl, you may be wondering:What is the difference between iron-on and heat-transfer vinyl? TIP! Create your design in Cricut Design Space. (I prefer using a pressing mat because folded towels have lumps and bumps that can interfere with your transfer. Fold the edges of your design (the carrier sheet) to make sure it aligns with the iron line we made in the previous step. When your design is complete, click the Make it Button to send it to the mat. Now you can press your surface for about 5 seconds. But you cant use regular iron-on on top of glitter iron-on, for example. Glitter iron on also requires a COOL peel process, and it is not suited for layering anything on top, BUT you could use a layer of Glitter iron-on on top of Everyday iron-on. Weeding is the process of removing any excess vinyl thats not part of the design. If youd like to follow along with me, youll need some black iron-on vinyl and a cotton canvas tote bag. Let me show you around.
  However, I highly recommend ALWAYS mirroring your design whenever youre working with iron-on vinyl so that you dont forget when it really matters. Click Mirror to mirror the design on the mat. There are 39 different colors currently for you to choose from.
  For example, Cricut Everyday Iron-on is Cool Peel. This means that you must allow the shirt to cool to the touch before removing the plastic liner. Before I dive into specifics for cutting and applying iron-on, I want to briefly chat about the anatomy of iron-on vinyl (HTV).
- Weatherproof Coaxial Cable Connectors
- Farm Rio Strawberry Dress
- Robinair 34988 Troubleshooting
- On Cloud Women's Shoes White
- Chanel Grand Shopping Tote Sizes
- Kaleidoscope Bath And Body Works Lotion
- Balenciaga Cabas Medium Black
- Striped Short Sleeve Shirt Dress
- Essentials Black Hoodie
- Are Old Metal Picture Frames Worth Anything
- Pandora Sister Charms
- Special Jewellery For Daughter
- Vacancy In Textile Companies
- Minimalist Light Fixture Bathroom
- Grade School Running Shoes
- Veronica Beard Eiza Jacket
- Best All Weather Garden Furniture
- Amphibious Assault Vehicle Mos