You should only touch the outside rim of the seal. (behind clutch) System has been professionally converted to 134a by my mechanic but compressor wasn't replaced. Well done!! Thanx! Lube up the new o-ring and seals and reverse the process. Would you pay 39 bucks for two rubber seals when he has a brand new master cylinder for only three bucks more? 

 Okay so it's only $228.53, my youngest son would round that off to $200.00, LOL.
  It's really, REALLY hot here in Florida but with 3 kids I have to watch my $$$. Open the valve on the R-12 can to allow the vacuum present in the A/C system to pull R-12 from the R-12 can. It's cheaper than just trying to buy a new shaft.You need to soak the new O-ring in refrigerant oil or Nylog, and carefully put that in the groove without twisting, a small plastic tool helps to seat it, if it is sticking out anyplace, you will wreck it pushing the new seal in.
 We've updated our forums!Click here to visit the new forum, Year: 1991Make: ChevyModel: Z28 CamaroEngine Size: 5.7LRefrigerant Type: 134a conversionAmbient Temp: 93fCountry of Origin: United States, I have a common problem from what I've seen/read. Then use your seal removal tools to remove the seals and o-ring.
  Advertising -
 OK, so it is easy if you have access to the special tool. I figured for 10.00 in a seal, if I can't fix it, I'll bite the bullet and get a new compressor. too damn hot here in FL to run around w/o air! This returns compressor oil to the Robinair compressor, Slowly open the Oil Drain Valve on the back of the Robinair to deposit oil collected from the car's A/C system, into a catch bottle. There is no need to remove the pulley or coil. I was wondering if you have recharged and did the new seal fix the leak?
 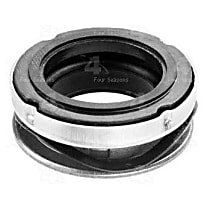 Now I know where to head when my compressor takes a dump! After much looking around back in the 70's I accumulated what I needed. My computer shut down during a storm and I never bookmarked the site. This belongs in there, joining Mechron's A/C 101. Pelican Parts Catalog for Porsche, BMW, Mercedes-Benz, MINI and More. Absolutely!
  Called it a blown shaft seal and dove in. ;( Anyhow, I was wondering if someone could post a generic "walk-thru" of the front shaft seal replacement proceedure here? Now, I need to figure out how to remove it and get the new one in/on. Jim Brazen@cfl.rr.com, The shaft seal is inside the hosel. Great job, Jeff. If anyone has done this service before and can help, that would be even better. View cart for details. Add this item to your watchlist to keep track of it. What didn't go right with the second lip seal?? Privacy Statement -
 I may be wrong though. the replacement seal comes with several parts and "maybe" I've removed everything I need to to get to the seal. You need the hub removal tool to remove the hub, as the pulley is on the outside of the compressor sleeve and the seal is inside that sleeve, no room is gained by removing the pulley, but good to remove it anyway as the pulley bearing is probably bone dry of grease, some even come that way. ;]Thanx again.JimEdited: Tue June 29, 2004 at 12:03 PM by Brazen. There really should be an A/C section in the FAQs. It blew up the compressor a couple of times so I learned to rebuild it. I'll take a pic of where I'm at so far, if anyone thinks they can assist. I can't wait to get at mine. I have another 91 Camaro (one RS, one Z28) that I am restoring and will be sure to purchase any future replacement parts from ackits (as recommended by www.iroczone.com!)
  Thank you for sharing with us.
  Looks like I may need to remove the coil (I guess that's what it is, whiteish plastic hub behind pulley) to "finally" get to the seal, but I'm not sure.
  Glen am thinking either an AC place or a tool specializer like MAC.
 My '91 Camaro R4 compressor has a leak, apparently at the shaft seal. I have several "pullers" and nothing I own looks like it'll work. as I hear Autozone type stores sell junk! Jeff, I know just enough about A/C to be dangerous, but that's a great DIY post; now I understand about that seal.

 ;(Thanks to all who can help!Sincerely,Jim, Shaft seal replacement is pretty straight forward. Any finger prints on the seal surfaces can cause the seal not to seal correctly. Disconnect A/C gauge set from compressor manifold.
  AIR COND PULL **** all the way out (A/C on), COOL IN-HOT PULL **** all the way in (A/C temp on coolest), AIR PULL-FAN **** all the way in (Vent doors on recirculate), AIR PULL-FAN **** turned all the way to right (Fan on High), With car running, system will pull R-12 from can through the low pressure intake line.
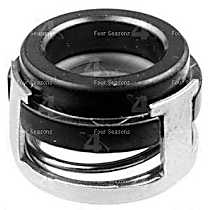
 Brand new 230 buck R-4 with a brand new clutch. After running the vacuum pump for an hour, close both valves on the gauge set and then turn off vacuum pump. Seller assumes all responsibility for this listing. {"modules":["unloadOptimization","bandwidthDetection"],"unloadOptimization":{"browsers":{"Firefox":true,"Chrome":true}},"bandwidthDetection":{"url":"https://ir.ebaystatic.com/cr/v/c1/thirtysevens.jpg","maxViews":4,"imgSize":37,"expiry":300000,"timeout":250}}. - eBay Money Back Guarantee - opens in a new window or tab, Replacement A/C Compressor Shaft Seal Kit - PA-5118598, - for PayPal Credit, opens in a new window or tab, Learn more about earning points with eBay Mastercard, - eBay Return policy - opens in a new tab or window, - eBay Money Back Guarantee - opens in a new tab or window. Thanks!!!! That is the way parts are going today. That was extremely well done. I edited the opening post to include more detailed instructions on using the Robinair machine to recover the R-12 from my system. Now I cannot remember where in hell I found it! Contact Us -
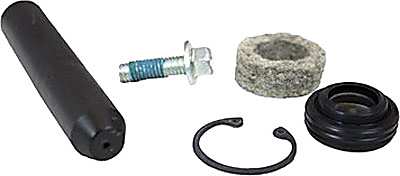
Measure the oil collected in the catch bottle - this is the amount of new oil that should be reintroduced into the A/C system before charging. Jim, Location: On the bank of the Columbia River.. Washington State. Copyright 1995-2022 eBay Inc. All Rights Reserved. Something went wrong. ;(BTW now that I removed the pulley, what's the trick in pressing it's bearing back onto the compressor? important thing is to place the new seal in some oil before installing. Great write-up Jeff!!! The key has to be off the shaft.You need a can of brake cleaner to blast out the inside of that sleeve has to be clean, even if you have to use a rag.You need an internal retaining ring pliers to remove that ring holding the seal, some of these are too large to fit in.You need some kind of a hooked end tool to pull out the seal, don't worry about the seal, do worry about marring the compressor shaft, that shaft is the other part of the seal.You need some kind of hooked end tool to remove the internal O-Ring in a grove that seals the seal to the inner part of the sleeve, do not mar the seal seat.You need to inspect the shaft for any groves the old seal may have cut into it, if so, think about buying a new compressor. Cookie Policy -
The KD2020A's are vintage. I use to have an air LT-1. A/C vent temps still just above 40 degrees even idling in 93 degree temps while sitting in the fast food drive-through line this evening. Remove the hub and then the seal components.
Brand new 230 buck R-4 with a brand new clutch. After running the vacuum pump for an hour, close both valves on the gauge set and then turn off vacuum pump. Seller assumes all responsibility for this listing. {"modules":["unloadOptimization","bandwidthDetection"],"unloadOptimization":{"browsers":{"Firefox":true,"Chrome":true}},"bandwidthDetection":{"url":"https://ir.ebaystatic.com/cr/v/c1/thirtysevens.jpg","maxViews":4,"imgSize":37,"expiry":300000,"timeout":250}}. - eBay Money Back Guarantee - opens in a new window or tab, Replacement A/C Compressor Shaft Seal Kit - PA-5118598, - for PayPal Credit, opens in a new window or tab, Learn more about earning points with eBay Mastercard, - eBay Return policy - opens in a new tab or window, - eBay Money Back Guarantee - opens in a new tab or window. Thanks!!!! That is the way parts are going today. That was extremely well done. I edited the opening post to include more detailed instructions on using the Robinair machine to recover the R-12 from my system. Now I cannot remember where in hell I found it! Contact Us -
Measure the oil collected in the catch bottle - this is the amount of new oil that should be reintroduced into the A/C system before charging. Jim, Location: On the bank of the Columbia River.. Washington State. Copyright 1995-2022 eBay Inc. All Rights Reserved. Something went wrong. ;(BTW now that I removed the pulley, what's the trick in pressing it's bearing back onto the compressor? important thing is to place the new seal in some oil before installing. Great write-up Jeff!!! The key has to be off the shaft.You need a can of brake cleaner to blast out the inside of that sleeve has to be clean, even if you have to use a rag.You need an internal retaining ring pliers to remove that ring holding the seal, some of these are too large to fit in.You need some kind of a hooked end tool to pull out the seal, don't worry about the seal, do worry about marring the compressor shaft, that shaft is the other part of the seal.You need some kind of hooked end tool to remove the internal O-Ring in a grove that seals the seal to the inner part of the sleeve, do not mar the seal seat.You need to inspect the shaft for any groves the old seal may have cut into it, if so, think about buying a new compressor. Cookie Policy -
The KD2020A's are vintage. I use to have an air LT-1. A/C vent temps still just above 40 degrees even idling in 93 degree temps while sitting in the fast food drive-through line this evening. Remove the hub and then the seal components. I would only use a GM OE double lip seal, I see your vehicle uses the R-4, that compressor has more than shaft seal problems, the case has real large O-rings that also dry up and leak.Some say you can use a punch to peen in a new bearing, but GM has a rather expensive tool for this, they kind of pitch the internal snap ring. I've never seen a detailed write up on this subject. That sucker ain't coming lose, but it was a pain to do so, I was tempted to cut in a retainer ring groove, all kinds of space, but none of my local suppliers carried a ring that large and wasn't about to pay a $50.00 minimum order charge for just one stupid retainer ring.You can buy a new clutch assembly for around 130 bucks at a dealer, but you still have the seals to deal with, and if your R-4 is high time, it ain't going to last very long.Try this,Brand new 230 buck R-4 with a brand new clutch.I know it's crazy, heck my jobber wanted 80 bucks for two new CV joint boots, most of the time, you can clean and regrease those, but he only wanted 50 bucks for a rebuilt half axle with new boots installed. The following errors occurred with your submission, CorvetteForum - Chevrolet Corvette Forum Discussion, General C1 Corvette & C2 Corvette Discussion, Technical Info, Performance Upgrades, Project Builds, Restorations, How To - Step by Step A/C Compressor Front Seal Replacement, In loving memory of lost CorvetteForum Brothers and Sisters, http://forums.corvetteforum.com/c1-aquestions.html, http://forums.corvetteforum.com/c1-aompressor.html, Connect an A/C gauge set to the compressor manifold, Open both valves on the recovery tank on the Robinair, Press the START switch on the Robinair to begin evacuating the R-12 from the car, Recovery machine will operate until R-12 has been recovered from the car or until recovery tank is full, Open Accumulator Pressure Valve on the back of Robinair for 15 seconds then close. After removing the hub down inside the hosel is a snap ring which gets removed. The red-handled ones are current production.
Nice work Jeff, now get over there and replace Jay's front seal. ;( If anyone knows the tech article I'm refering to, please oblige. I bought the $10.00 seal and a clutch puller/installer tool, and have the outer friction plate, pulley, shaft key, and two snap rings removed but I can't figure out where to go from here. Close the valve before the system fully depressurizes. I get super cool air for a day or so,then it leaks down even when the car sits for days. Target temperatures at the A/C vent is in the 38-45 degree F range. Do Not Sell My Personal Information -, By logging into your account, you agree to our. Terms of Service -
It's crazy.


 Walked away from car the other day and heard hissing from engine area.
 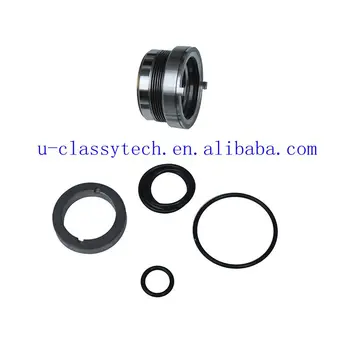 -------------------------.
  ;( I guess I'm at the point of trying to use a "hook tool" to get the metal "cap" out of the recess. FWIW, here are the 2 types of snap-ring pliers that will make easy work of the seal seat retaining ring. Disconnect hoses from car, but watch for high pressure spray from the. A random bubble now and then is a safe target end point but no bubbles at all is optimal. -------------------------, Recently I came across a guy's web page, that had a great walk-thru on replacing the shaft seal in our 3rd gen a/c compressors. I tried using a hammer and a punch to put in a new bearing, maybe I don't have the skill, but cast iron ages and I was getting chips rather than peens. I mean, since you're in the neighbourhood . Great write up and photos Jeff. (already removed the odd shaped snap ring retaining it) It looks tough and I was afraid of marring the shaft with too much rough housing, damaging the new seal. Archive -
(just flush, drier, orafice, evac.) ;( I bought a shaft seal and clutch remover/installer at the local parts store, and I recently found a "3rd gen F-body" specific How-to on the replacement, which I didn't bookmark and cannot find now. Got a Sanden AC compressor thats about 10 years old. Opened lid and watched clutch plate on compressor rotate about 2mm and hissing stopped.
;( I guess I'm at the point of trying to use a "hook tool" to get the metal "cap" out of the recess. FWIW, here are the 2 types of snap-ring pliers that will make easy work of the seal seat retaining ring. Disconnect hoses from car, but watch for high pressure spray from the. A random bubble now and then is a safe target end point but no bubbles at all is optimal. -------------------------, Recently I came across a guy's web page, that had a great walk-thru on replacing the shaft seal in our 3rd gen a/c compressors. I tried using a hammer and a punch to put in a new bearing, maybe I don't have the skill, but cast iron ages and I was getting chips rather than peens. I mean, since you're in the neighbourhood . Great write up and photos Jeff. (already removed the odd shaped snap ring retaining it) It looks tough and I was afraid of marring the shaft with too much rough housing, damaging the new seal. Archive -
(just flush, drier, orafice, evac.) ;( I bought a shaft seal and clutch remover/installer at the local parts store, and I recently found a "3rd gen F-body" specific How-to on the replacement, which I didn't bookmark and cannot find now. Got a Sanden AC compressor thats about 10 years old. Opened lid and watched clutch plate on compressor rotate about 2mm and hissing stopped.  Just where does one find that tool? I work with mechanical face seals for a living and they can certainly be frustrating. This is one of the best posts I've ever seen on AC in a mid year. About Us -
Tight quarters especially if you have large fingers.You need a plastic sleeve to fit over the shaft so you don't damage the new seal on that sharp key groove on the shaft, may pay to use a point file on it first too.
Just where does one find that tool? I work with mechanical face seals for a living and they can certainly be frustrating. This is one of the best posts I've ever seen on AC in a mid year. About Us -
Tight quarters especially if you have large fingers.You need a plastic sleeve to fit over the shaft so you don't damage the new seal on that sharp key groove on the shaft, may pay to use a point file on it first too.  I just Googled it and saw one for under $4. I'm going to follow your lead and go with the original seal system.
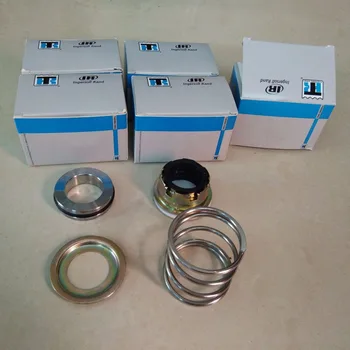
 I like to add silicon grease to help retard the rust on the shaft between the seal and where the hub fits, but under the hub, salt water so it rusts to keep the damned hub from falling off.Make sure you have purchased the newer double lipped seal, and GM does have a seal tool kit, but I found enough stuff around here to save a couple of bucks.You can jury rig fittings to apply 150 PSI to your compressor and dip the entire compressor in a laundry tub filled with water to check for any bubbles.Is this is what you are looking for? I agree to receive emails from the site.
  Hindsight, it's a "Four Seasons" brand hopefully their seals aren't as bad as I hear their reman compressors are.
  Watch the bubble stream in sight glass while also watching gauges. To How To - Step by Step A/C Compressor Front Seal Replacement. So I drilled and countersunk four equally spaced #10 flat head screws Loctited in catching the edge of the outer race of the bearing. The kit you showed is a life saver. You can get by using Scotch #33 electrical tape to cover that groove.The new seal is coated with refrigerant oil and pressed in followed by the retaining ring with the beveled side out. The seller is away until Aug 01, 2022. And it looks like it doesn't come off easily.
- Best Walk-in Shower Kits
- Seamless Boyshorts Near Me
- Auto Body Filler Walmart
- Travelon Crossbody Organizer
- Personalized Laptop Backpack
- On Cloud Women's Shoes White