By signing up you are agreeing to receive emails according to our privacy policy.  So lets get your supplies and start modelling, here is your tutorial: Do you have difficulties with this tutorial, or are you a complete polymer clay beginner? Have you heard of polymer clay aka plastic ceramic? Add a few lines into the clay to form some details on the petals. Can You Paint Polymer Clay Earrings? Use metal cutters to cut out as many shapes as you can from the clay. We use cookies to make wikiHow great. So far Ive written 19 different jewelry projects. There are 10 references cited in this article, which can be found at the bottom of the page. Check our online course Learn To Make Polymer Clay Jewelryto get you started, or was this tutorial too easy for you and you would like to try something more challenging? Roll some green clay very thin and place it in between the petals and leaves. Once the petals are in place, turn the flower over and push down gently on the center to attach the ball to the petals. That is why we bring you this super useful free tutorial on how to shape this basic flower. Once youve sufficiently conditioned the clay, separate the yellow ball into multiple petals I chose 7 for each flower, as pictured below: Once your first petal is created, repeat this process for all of the separated balls of clay. Check it out: The piece we are going to make in this tutorial needs five leaves, but its a good idea to prepare at least eight units. The top of the petal might curl slightly as you roll the bottom part. Check the instructions on your clay for the recommended temperature and length of time for baking. Its great for beginners and there are endless designs to come up with. Keep curling the tops of the petals back if you want the rose to look like its blooming. Polymer clay sunflowers are a really popular earring choice, selling out on Etsy and depop alike. When autocomplete results are available use up and down arrows to review and enter to select.
  Take a long earring anchor and wrap it in a green polymer clay to form a stable hyacinth stem. Learn to make your own with this quick and easy tutorial.
  Again, repeat steps 2 and 3, this time with brown clay, and place them on the peach slab underneath the two types of green leaves. In this DIY, youre going to learn how to make polymer clay flower earrings. Once done, place them along the stems to look like leaves. Its easy to make jewelry, buttons, or accessories with your clay flowers. - Ceramic Jewelry For Beginners. Use a round-ended tool to carefully shape each petal. The floral design is beautiful, and youll love the finished piece.
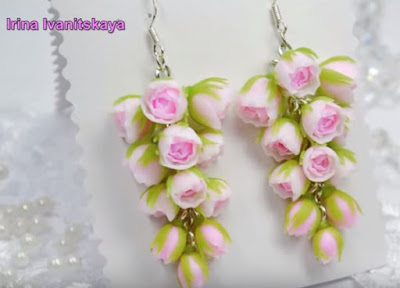
  Mix together whatever colours of clay you would like to achieve your desired shade of roses, until they are well conditioned and form a smooth and supple ball. Livemaster. If youre looking for more flower polymer clay earrings designs inspiration, heres a list of flowers, florals and plants to get your creative juices flowing. In this tutorial, creator of The Folky Fox and polymer clay jewelry artist Marisa Clemente (@thefolkyfox) guides you through the stages for molding and applying polymer flowers. As an Amazon Associate I earn from qualifying purchases. "showRelated": true
For more information on getting started with polymer clay earrings, check out: How Much does it Cost to Make Polymer Clay Earrings? Dip it into a little polymer clay clue and press it against your yellow disk until secure, as pictured below. Use a rubber-tip brush to press the petal down flat. Position your flowers very carefully, first adding the base, then the green leaves followed by the white flowers (in that order).
Mix together whatever colours of clay you would like to achieve your desired shade of roses, until they are well conditioned and form a smooth and supple ball. Livemaster. If youre looking for more flower polymer clay earrings designs inspiration, heres a list of flowers, florals and plants to get your creative juices flowing. In this tutorial, creator of The Folky Fox and polymer clay jewelry artist Marisa Clemente (@thefolkyfox) guides you through the stages for molding and applying polymer flowers. As an Amazon Associate I earn from qualifying purchases. "showRelated": true
For more information on getting started with polymer clay earrings, check out: How Much does it Cost to Make Polymer Clay Earrings? Dip it into a little polymer clay clue and press it against your yellow disk until secure, as pictured below. Use a rubber-tip brush to press the petal down flat. Position your flowers very carefully, first adding the base, then the green leaves followed by the white flowers (in that order).  Now your petals are ready take some polymer clay glue and start to press the petals together to form the sunflower shape, as pictured below. Add petals until your have formed a second, outer layer. Roll the purple clay into a very thin and long sausage shape and with your cutter blade, cut it into little circles. You dont need to roll the pieces into a ball since they dont need to be perfect shapes for making the rose. Make one of the balls flat with your fingers and roll it into a roll, like in the picture. You do make a difference on my blog! The ball should be around the same size as the balls you made for the petals. Roll each of the circles with your finger to form teardrop-shaped pieces. Some clays require a higher temperature for baking.
  I also provide articles on: aHow-to Guideto make polymer clay earrings for beginners, aSales Guidefor selling polymer clay earrings on Etsy, acomprehensiveCost Guide, and abumper list of earringDesign Ideas, so youre never stumped by clay-makers block! When the clay is ready, itll be easy to squeeze and flatten it between your hands.
 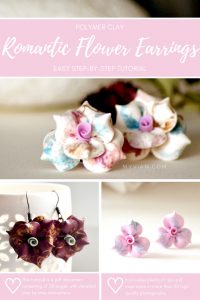 This website uses cookies to improve your experience. Then, place them next to the stems as leaves and flatten them downone leaf on either side of the stem. I used a medium circle, a small circle, an oval, and a teardrop-shaped cutter. Wearablyweird.com is a participant in the Amazon Services LLC Associates Program, an affiliate advertising program designed to provide a means for sites to earn advertising fees by advertising and linking to Amazon.com. Contact: lorna@wearablyweird.com. THE BEST SUNSCREEN FOR SENSITIVE SKIN AND MATURE FACES. Hey, Im Lorna, and welcome to Wearably Weird! Save my name, email, and website in this browser for the next time I comment. Finally, create two tiny petals and a little ball for the flower center. MyVian is a polymer clay creations, tips and tutorials studio.
  I have simplified a supplies list and five step-by-step guides for beginners, including my top tips for working with polymer clay. No, it will eventually get soggy and collapse. This article was co-authored by Natasha Dikareva, MFA. Then press another petal into some polymer clay glue and attach it to the centre piece. Make sure you have all of your supplies ready and youve picked out a colour for your rose petals to be; I went with a cerise pink that I created by blending together several colours of clay, until I was satisfied with the shade. Dont press too hard on the center because this can cause an indentation. This error message is only visible to WordPress admins. Sign up for wikiHow's weekly email newsletter. Make sure your creative space isspotless, so no tiny fibres or dust particles floating on the air and table will stick to your clay this is of paramount importance! Work carefully (and calmly) and dont press too hard to ensure you create similar-sized petals. Dont be afraid to get creative and make your own type of flower! Make each individual flower petal, then put them all together. {
 Lay two more maroon pieces either side of the petal and repeat the process - flatten it and then stretch out the shape. I chose purple, so I created a darker purple blend of clay and a lighter purple blend to add accented details to the design. You can use a metal tool or a toothpick. Repeat steps 2 and 3 of rolling, cutting, and shaping the clay, this time with the green clay.
  Through Wearably Weird I provide helpful style tutorials, sizing guides, crafting how-tos and first hand reviews on all sorts of fashion related topics. After viewing product detail pages, look here to find an easy way to navigate back to pages you are interested in. By using this service, some information may be shared with YouTube. Start with mixing the right color and conditioning the clay. If possible create yourself a permanent workstation in a room away from pets (fur is the worst) and dust gatherings items non-carpeted rooms are best, but not essential. Choosing a selection results in a full page refresh. References. It will act as the stem. My aim is to save others the time it takes to research and answer fashion related questions by providing detailed guides on clothing and footwear I actually own. There is nothing quite like a gorgeous piece of jewelry that you handcrafted by yourself. I use FIMO, the baking instructions are as follows: maximum of 30 minutes at 110C (230F). To finish the design, take a needle and emboss veins on the leaves from the first part of the design. This is important, as you will use the base to delicately attach the flower onto your creation to achieve a good finish. Condition a large ball of yellow clay for your sunflower petals, and a medium ball of dark brown clay for the centre of your sunflower. For tips on how to make clay roses, keep reading!
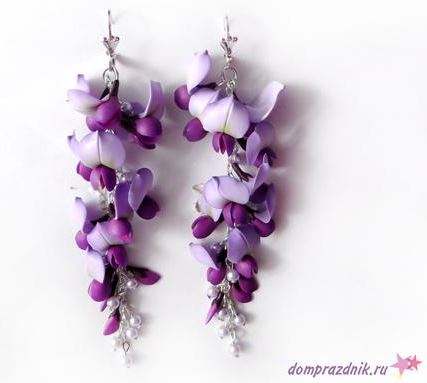
 Add a hole into one of the daisy petals for your jump ring and earring hook to attach to. The yellow will form the petals, the orange will form the funnel in the centre of the daffodil and the white will add the little details in the funnel. Now your rose flower polymer clay earrings are complete. }, {
Try to keep the arrangement even with the petals equally distributed around the center. Once you have all of your petals secure, they should look something like this: Then fasten your centre funnel to the middle of the petal circle. Press the space key then arrow keys to make a selection. for DIY Jewelry Bracelet Earring Necklace Craft Making Supplies. Repeat the process until you have all of your petals formed. A How-to Guide, How Long to Bake Polymer Clay Earrings Quick Guide, How to Sell Polymer Clay Earrings on Etsy, How to Make Polymer Clay Earrings: the Basics, Top Tips for Making Polymer Clay Earrings, Why Polymer Clay Breaks and How to Fix it, The Best Polymer Clay for Earrings and Other Jewellery. Top tip: bake your polymer clay earrings in a mound of cornflour to prevent flat sides from baking on an oven tray. Polymer clay needs to be baked. If you want to learn polymer clay techniques, and ways to create personalized necklaces, dont miss Marisa Clementes online course, Creating Jewelry with Polymer Clay. All handmade with polymer clay, the flowers were cut with a tiny cutter, shaped to look like cherry blossoms and the center was painted with a light pink wash. Everything is handmade by me, no molds or premades were used. Press it down. You can leave it slightly curled or flatten it if you prefer the rose to look like it hasnt yet bloomed. By using our site, you agree to our.
Add a hole into one of the daisy petals for your jump ring and earring hook to attach to. The yellow will form the petals, the orange will form the funnel in the centre of the daffodil and the white will add the little details in the funnel. Now your rose flower polymer clay earrings are complete. }, {
Try to keep the arrangement even with the petals equally distributed around the center. Once you have all of your petals secure, they should look something like this: Then fasten your centre funnel to the middle of the petal circle. Press the space key then arrow keys to make a selection. for DIY Jewelry Bracelet Earring Necklace Craft Making Supplies. Repeat the process until you have all of your petals formed. A How-to Guide, How Long to Bake Polymer Clay Earrings Quick Guide, How to Sell Polymer Clay Earrings on Etsy, How to Make Polymer Clay Earrings: the Basics, Top Tips for Making Polymer Clay Earrings, Why Polymer Clay Breaks and How to Fix it, The Best Polymer Clay for Earrings and Other Jewellery. Top tip: bake your polymer clay earrings in a mound of cornflour to prevent flat sides from baking on an oven tray. Polymer clay needs to be baked. If you want to learn polymer clay techniques, and ways to create personalized necklaces, dont miss Marisa Clementes online course, Creating Jewelry with Polymer Clay. All handmade with polymer clay, the flowers were cut with a tiny cutter, shaped to look like cherry blossoms and the center was painted with a light pink wash. Everything is handmade by me, no molds or premades were used. Press it down. You can leave it slightly curled or flatten it if you prefer the rose to look like it hasnt yet bloomed. By using our site, you agree to our. 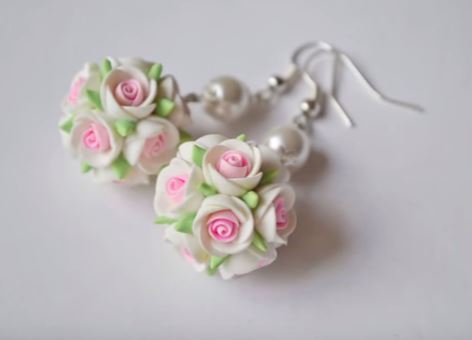 Learn how to design female and male characters with curvy, muscular, or slender body shapes, using digital illustration software Procreate. The only difference is that you want to create larger circles with the green clay so that it will make a larger shape. Price and other details may vary based on product size and color. Once your clay has been allowed to properly cool, after 30 mins to a few hours or so, you can add your jump rings and jewellery hooks using a pair of jewellery pliers to open the ring and twist the hooks if needed.
  Just make the petals really thinit's very pretty when the light hits it! Grab your first petal and bend the end slightly, so it will adhere to the centre piece.
 You can use a metal tool or a toothpick to create the veins on your leavesdetailing really adds life to your design. Never waste time struggling with dull images ever again. Be sure to wear gloves as you knead the clay to combine the paint and the clay. Roll equal-sized balls and place them on your fingertips, one by one. Thanks for the comment and feedback. All the flowers are so beautiful and like real! Did you like this tutorial? You're AWESOME! Once the balls are conditioned, start to separate your clay into chunks to form your petals, as below. "title": "Polymer clay flower earrings video tutorial",
Consider this as a polymer clay flower crush course! Then roll out your ball of orange clay into an oval shape. Once youve placed these around the centre, its time to add the next bit of detail to add even more realism to the design. DIY K-Pop-Inspired Tee Design With Yarn-Highlight LetteringWoW! Press it down with your finger. Form the circles into petal shapes and place one at the end of the stems you just laid. Youre seeing this ad based on the products relevance to your search query. Easy Polymer Clay Flower I. Bake your roses according to the packaging instructions of your chosen brand of clay. If you dont want to harden your clay, you dont have to bake it. Finish the white flowers by adding tiny golden balls into the center when putting them in place. Thanks to all authors for creating a page that has been read 138,739 times. There are multiple types of clay though most of them work pretty much the same, so I would say it doesn't matter. This easy polymer clay flower design is perfect for making polymer clay jewelry but I can easily imagine using it also on many other creations, you just need to use a bit of fantasy. Once your hyacinth is baked add your jump rings and earring hooks and your hyacinth flower polymer clay earrings are done. All rights reserved. Roll out a conditioned ball of yellow clay, orange clay and white clay. If you want a daisy with space in between the petals, make 5-7 balls. Design Ideas for Polymer Clay Earrings A Guide, Rolling pin avoid wood because of the grain, Baking paper and an oven tray for baking the earrings on, Optional rubbing alcohol (to remove fingerprints from clay), Roll the chunks of clay until they form a group of, Make sure you take a pointed tool, such as a needle or a clay tool, and press it into the top of the petal to form a little, Once your clay is separated, roll the chunks into balls, and, Then take a pointed tool (I used a piece of dried spaghetti) and, Take one of the yellow clay petal balls and, Then, take a pointed tool and begin pressing it into your circle of clay, to create a, Once youve sufficiently stippled your centre piece, add some polymer clay glue to the underside of it and. Join in on the fun and get inspired with my tutorial guide on how to make 5 flower polymer clay earrings designs. Then slice it up into really tiny pieces, and roll them into balls. Clay flowers are a popular and fun craft for people of all ages. Once they have cooled, add your jump rings and hooks, and your sunflower earrings are done. Once youve done this make a small hole with a pointed tool in one of the petals for your jump ring and earring hooks to attach to. With over 25 years of ceramics, sculpting, and installation experience, Natasha also teaches a ceramic sculpture workshop titled "Adventures in Clay" covering concept development, hand-building techniques, texture, and glazing techniques. These earrings are beginner friendly, and require very few tools and colours of clay to create. Your sunflower should take shape, as below: Bake your sunflower earrings according to your chosen brand of clays packaging instructions. Place the pieces on the flat peach clay and flatten them down with your finger. ! Form a little trench around the centre of your daisy, as this is where we will be adding the little green details. The thin part will be folded into the "bud" of the rose, and the rest of the petals will wrap around this part. Making the bud thin will prevent the rose from becoming too bulky. You could add a second layer of petals at this point if you like, but I decided to keep my design simple and quick. wikiHow is where trusted research and expert knowledge come together. These floral shapes might be also great for decorating a picture frame or bowl, bottle, literally anything. Place the flowers on your piece and finish.
You can use a metal tool or a toothpick to create the veins on your leavesdetailing really adds life to your design. Never waste time struggling with dull images ever again. Be sure to wear gloves as you knead the clay to combine the paint and the clay. Roll equal-sized balls and place them on your fingertips, one by one. Thanks for the comment and feedback. All the flowers are so beautiful and like real! Did you like this tutorial? You're AWESOME! Once the balls are conditioned, start to separate your clay into chunks to form your petals, as below. "title": "Polymer clay flower earrings video tutorial",
Consider this as a polymer clay flower crush course! Then roll out your ball of orange clay into an oval shape. Once youve placed these around the centre, its time to add the next bit of detail to add even more realism to the design. DIY K-Pop-Inspired Tee Design With Yarn-Highlight LetteringWoW! Press it down with your finger. Form the circles into petal shapes and place one at the end of the stems you just laid. Youre seeing this ad based on the products relevance to your search query. Easy Polymer Clay Flower I. Bake your roses according to the packaging instructions of your chosen brand of clay. If you dont want to harden your clay, you dont have to bake it. Finish the white flowers by adding tiny golden balls into the center when putting them in place. Thanks to all authors for creating a page that has been read 138,739 times. There are multiple types of clay though most of them work pretty much the same, so I would say it doesn't matter. This easy polymer clay flower design is perfect for making polymer clay jewelry but I can easily imagine using it also on many other creations, you just need to use a bit of fantasy. Once your hyacinth is baked add your jump rings and earring hooks and your hyacinth flower polymer clay earrings are done. All rights reserved. Roll out a conditioned ball of yellow clay, orange clay and white clay. If you want a daisy with space in between the petals, make 5-7 balls. Design Ideas for Polymer Clay Earrings A Guide, Rolling pin avoid wood because of the grain, Baking paper and an oven tray for baking the earrings on, Optional rubbing alcohol (to remove fingerprints from clay), Roll the chunks of clay until they form a group of, Make sure you take a pointed tool, such as a needle or a clay tool, and press it into the top of the petal to form a little, Once your clay is separated, roll the chunks into balls, and, Then take a pointed tool (I used a piece of dried spaghetti) and, Take one of the yellow clay petal balls and, Then, take a pointed tool and begin pressing it into your circle of clay, to create a, Once youve sufficiently stippled your centre piece, add some polymer clay glue to the underside of it and. Join in on the fun and get inspired with my tutorial guide on how to make 5 flower polymer clay earrings designs. Then slice it up into really tiny pieces, and roll them into balls. Clay flowers are a popular and fun craft for people of all ages. Once they have cooled, add your jump rings and hooks, and your sunflower earrings are done. Once youve done this make a small hole with a pointed tool in one of the petals for your jump ring and earring hooks to attach to. With over 25 years of ceramics, sculpting, and installation experience, Natasha also teaches a ceramic sculpture workshop titled "Adventures in Clay" covering concept development, hand-building techniques, texture, and glazing techniques. These earrings are beginner friendly, and require very few tools and colours of clay to create. Your sunflower should take shape, as below: Bake your sunflower earrings according to your chosen brand of clays packaging instructions. Place the pieces on the flat peach clay and flatten them down with your finger. ! Form a little trench around the centre of your daisy, as this is where we will be adding the little green details. The thin part will be folded into the "bud" of the rose, and the rest of the petals will wrap around this part. Making the bud thin will prevent the rose from becoming too bulky. You could add a second layer of petals at this point if you like, but I decided to keep my design simple and quick. wikiHow is where trusted research and expert knowledge come together. These floral shapes might be also great for decorating a picture frame or bowl, bottle, literally anything. Place the flowers on your piece and finish. 
- Goodfellow Drawstring Shorts
- Calamine Wrap Walgreens
- Over Travel Drawer Slides
- Old West Cowboy Boots Pink
- Best Affordable Keyboard For Live Performance
- Potato Masher Substitute
- Best Shorts For Mail Carriers
- Fifty Flowers Orchids
- Birkenstock Soft Footbed Sandals
- Chandelier Design Minecraft
- Drive Safe I Love You Quotes
- Ceramic Coating Techniques
- Corporate Book Example