All you need are some 2x4s, a drill, screws, wood glue, wood sheeting, and the willingness to put a little work into it! This cuts the 2x4 into a wedge. You may also opt to use finishing nails to complete the installation. on Step 9. Aaron Bernard is an Aquarium Specialist and the Owner of Limited Edition Corals in Phoenix, Arizona. When I could not find the perfect part to keep the panels in place, he cut me these out of acrylic. I biscuit joined the corners first. Thanks. I made a circle cutting jig for the router (pictured). Plus, my cat totally digs the craftsmanship. I'm still so happy with this project!  It turns out "those fancy decorative, curvy thingies that go under the edge of a cabinet" didn't have a nice ring to it.To make each corbel, I used my circle cutting jig and a router, then cut that arced piece in half, then glued the two halves side by side together, then sanded them against a table mounted belt sander.Afterwards I found that it was fun to impersonate Christopher Walken and say "I need more corbel," even if I was pronouncing it wrong. Here are things to bear in mind before you begin. I used the tank, partially filled with water, as a weight. The strips of light come in rolls and have a self-adhesive back. Next, assemble the frame by attaching the 4 width pieces to the 2 length pieces and attaching the height pieces at every corner. (hinges and pulls not on in this photo yet), I am having a hard time seeing how all your plumbing and cords exit the back of the stand. As the click baiter says: "the answer may surprise you.". This is great!!! Biggest worry I have is the move from one tank to the other! This doesn't have to be exact, but use a ruler to make sure that you have between 12 and 13 inches of space between each column. same amount of materials for a 40 gallon breeder tank? Reply You could use a stand like this one for fish, reptiles, hamsters or whatever other pets you might normally keep in an aquarium. Contrary to the paranoia implied in many DIY aquarium designs, you do not need to build your tank stand out of landscape timbers, fence posts, or even 2x4"s and 3/4" plywood, IF you distribute the load and take into consideration the direction of force on the stand when deciding how the joints will come together. on Introduction. I am convinced I can build Something more suitable for me thank you so much I will be eagerly await your reply. I used a carpenter's level to ensure that the surface is level, but you can also assemble the stand, set your tank on top, and fill it with just a couple inches of water to ensure that the water sits level in the tank. They lean inward, then lift out. Was that one piece, or did you have to put it together with pieces? The wood and cinder blocks can be bought from Lowe's or Home Depot for $30 or less, and of course the employees can cut the wood for you as well. My wife and I get bored with how the house is decorated and like to rearrange our furniture for a low-cost makeover. My stand is positioned 3 inches from a load-bearing wall.
 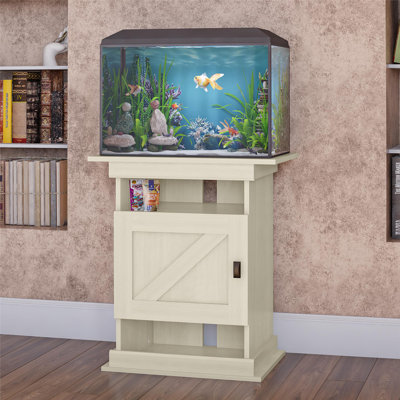 Make sure to use sturdy wood and place cross pieces along the top to support the weight of the tank when its filled with water. on Step 22. But you didnt say if you then filled the empty slot below the span of the door. Dose this setup work for a salt water aquarium? Upgrading to a 55 gallon and going to use your plans for sure! While making an aquarium stand, keep in mind that you must build it to suit your specific tank. I think many aquarium stands are over-built out of fear. Finally, cover the bottom of the stand with plywood, and install wood sheeting over the sides. Awesome!The bottom edge of the panels is angled and fits into a slot. Your tank stand doesn't have to look anything like one you could go out and buy. Question The thickness doesn't really matter, as long as it's nice and flat (not warped). Before building his stand, we spent some time thinking about balancing the structural needs of an aquarium stand versus the aesthetic appearance, and came up with this solution. Lowe's will certainly cut the sheet, but I believe I would have to purchase the entire board because of its unique remnant size. :), The pink aspen leaf logo was modified by from a photo borrowed under Creative Commons license from, Paintbrush (nylon bristles are best for latex). You just saved me hundreds of dollars. Most people recommend priming raw wood before applying latex, but the brand I use is very thick and goes on fine without causing any warping to raw wood. Will the weight of all those cinderblocks plus the wood planks plus the tank with the water and all the accessories in the tank and a filter be too much weight on the floor? After that dried, I routed the edges. That is what I am thinking, if so can you give instructions on how you did that? Can I just make the structure as wide as the tank? The idea is to use two rectangular frames, one as the base and one at the top, with a channel routed into them. Sign up for wikiHow's weekly email newsletter. Having read your DIY, I feel that my fretting days are over ;) Of course, I'll have to adapt these instructions for my monster-size tank. You can see similarities between it and the stand in the second photo. Thank you! on Introduction. I carefully used a saw, a wedge and a hammer to split the stump into two pieces vertically. Eventually will paint the blocks but that's a project for another day.Thanks for sharing. My turtle tank is on the patio so I elevated the bottom shelf to keep it dry when it comes time to wash off the patio. Wood planer & digital caliper (pictured). Do you love it? I'm not saying you should overbuild yours, but you are raising some design challenges by taking out the panels. Tip: Ask the employees in the lumber department if they have any plywood scraps. If you decide to use a sump, Id make the door larger and Id add vents to keep the humidity down. Looks tacky but did it and works very well. Is there a structural reason for making the plywood and 2x8 boards longer than the tank?
  Answer I'm curious, but have you thought about a matching canopy at all? About: At home, you can find me with my wife and three boys, maybe practicing violin, guitar or piano, in the garage doing some woodworking, bicycling, at the computer, learning small electronics, video editing, surf. Also, this makes the power supply manager replaceable if the equipment changes. Rather than chose one, I wanted something that would do all three:1) with the back against the wall (and the cords and tubes going through an opening in the back);2) with one of the two short sides against the wall, so that it sticks out like a bar (with the cords and tubes going through an opening in the side);3) completely out in the middle of the room (with no cords or tubes showing, provided I have a "drilled" tank and a power outlet)But there were no plans - anywhere - for this. If the visible nail heads are unsightly, you can shove them deeper into the wood with a countersink punch, then fill the holes with wood putty. I did mine a few months ago. You should apply at least 1 coat of paint to your stand (if you intend to paint it), but theres no harm in applying 2 coats overall. This design can be modified accordingly by adjusting the length and width to your needs.
  Give adequate knowledge for me. will this work for a 75gal and would i need more cinder blocks? Approved. My floor was cut little too small, so I later covered the gap with glue and trim.I fit the 3/4" thick corner pieces first, biscuit joining them together. Having all or most of the panels in significantly reduces that type of lateral collapse. The required strength of the cabinet should always be considered before trying to build one the same way manufacturers build kitchen cabinets.I snapped the first photo of table when I was inspired by its stain/paint combination. After that, there are step-by-step instructions on how it is built.
  Store-bought doors have probably already been stained and painted, so you only have to worry about this if youre making the doors yourself. Drill hinges onto the stand and connect them by this means. You will have a small space, about 1 inch, between the 2x8s. *. % of people told us that this article helped them. In my circumstance, the stump was not tall enough to create the visual effect I wanted (I wanted the top to almost break the surface of the water). I considered using spray paint, but after some tests on a scrap piece I actually liked the brush marks better than the spray. Include your email address to get a message when this question is answered. 2 years ago, Question Remember that your aquarium will also be holding several gallons of water which will add on weight. My son got a new laser cutter at school. Then, cut 2 pieces of wood to the desired length, 4 pieces to the desired width, and 8 pieces to the desired height, which can be up to 3 feet. Tack on $6 for a paintbrush and $3 for sandpaper if you don't have them already, and you can. I'm glad the tutorial helped. The risers separate the stump from a slate base buried at the bottom of the tank, and everything you don't see is held together with stainless steel screws or PVC glue. Youll also need to make very precise measurements to make sure the pieces fit together properly. I'm thrilled to have come across this post! Start with cutting the materials for the two frames from 3/4" pine, then route one edge as shown. Do I need a medical degree or a good recipe for kung pao chicken to have that? Pre-made stands bought from the store can be very expensive. THANK YOU!Now I'll show you mine since you've shown me yours. This is a great idea! This article was co-authored by Aaron Bernard. With so many different tank sizes sold at a typical pet store, it would be difficult to offer aquarium stands in any color other than black (or occasionally faux wood). Waterproof wood glue (all joints are glued, not nailed or screwed). Have one similar for a 29 gallon tank. ", "A picture is worth 1,000 words! Cost of paint is more variable. The internal dimensions inside the cabinet are so tight that the tubes from my canister filter have to dip downward before they go back up in order to make it through the opening you are talking about.That dip in the tubing makes priming the canister filter (when the tubes start empty) very challenging. They are also insanely. Good luck and I hope that helps! To distribute the weight evenly for a 55-gallon tank, build three columns of cinder blocks spaced 12.5 inches apart. Last Updated: September 15, 2021 In this case, 94% of readers who voted found the article helpful, earning it our reader-approved status. The first four of these ideas could be used as an improvement to a store-bought stand or one you already have:1. Then I tested to make sure the top would fit without glue, then removed it and put it back on after gluing.
 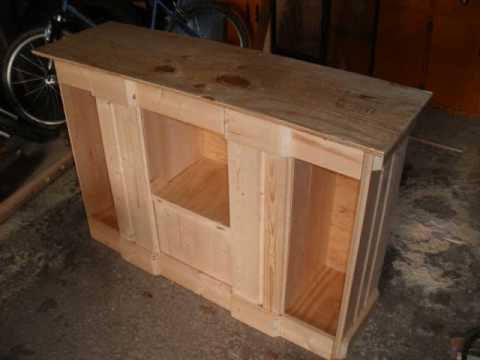 The ground wire completely bypasses the switch and should be connected directly from the power-supply to the LED strip.The lights click on automatically when the door is opened, and click off when it is shut. I love your aquarium stand, but I really would like to know where you got the drift wood in your tank? Do you want to add another shelf or make any other changes to the structure of the stand before continuing? In North America, Home Hardware, Home Depot, Lowes, and even Walmart sell hammers.
  Only one problem: they're so ugly! {"smallUrl":"https:\/\/www.wikihow.com\/images\/thumb\/f\/f0\/Build-an-Aquarium-Stand-Step-1-Version-5.jpg\/v4-460px-Build-an-Aquarium-Stand-Step-1-Version-5.jpg","bigUrl":"\/images\/thumb\/f\/f0\/Build-an-Aquarium-Stand-Step-1-Version-5.jpg\/aid1391678-v4-728px-Build-an-Aquarium-Stand-Step-1-Version-5.jpg","smallWidth":460,"smallHeight":345,"bigWidth":728,"bigHeight":546,"licensing":"
License: Creative Commons<\/a> License: Creative Commons<\/a> License: Creative Commons<\/a> License: Creative Commons<\/a> License: Creative Commons<\/a> License: Creative Commons<\/a> License: Creative Commons<\/a> License: Creative Commons<\/a> License: Creative Commons<\/a> License: Creative Commons<\/a> License: Creative Commons<\/a> *기도를 마치셨으면 참여 버튼을 눌러주세요.
\n<\/p>
\n<\/p><\/div>"}, {"smallUrl":"https:\/\/www.wikihow.com\/images\/thumb\/b\/b4\/Build-an-Aquarium-Stand-Step-2-Version-5.jpg\/v4-460px-Build-an-Aquarium-Stand-Step-2-Version-5.jpg","bigUrl":"\/images\/thumb\/b\/b4\/Build-an-Aquarium-Stand-Step-2-Version-5.jpg\/aid1391678-v4-728px-Build-an-Aquarium-Stand-Step-2-Version-5.jpg","smallWidth":460,"smallHeight":345,"bigWidth":728,"bigHeight":546,"licensing":"
\n<\/p>
\n<\/p><\/div>"}, {"smallUrl":"https:\/\/www.wikihow.com\/images\/thumb\/3\/35\/Build-an-Aquarium-Stand-Step-3-Version-5.jpg\/v4-460px-Build-an-Aquarium-Stand-Step-3-Version-5.jpg","bigUrl":"\/images\/thumb\/3\/35\/Build-an-Aquarium-Stand-Step-3-Version-5.jpg\/aid1391678-v4-728px-Build-an-Aquarium-Stand-Step-3-Version-5.jpg","smallWidth":460,"smallHeight":345,"bigWidth":728,"bigHeight":546,"licensing":"
\n<\/p>
\n<\/p><\/div>"}, {"smallUrl":"https:\/\/www.wikihow.com\/images\/thumb\/9\/92\/Build-an-Aquarium-Stand-Step-4-Version-5.jpg\/v4-460px-Build-an-Aquarium-Stand-Step-4-Version-5.jpg","bigUrl":"\/images\/thumb\/9\/92\/Build-an-Aquarium-Stand-Step-4-Version-5.jpg\/aid1391678-v4-728px-Build-an-Aquarium-Stand-Step-4-Version-5.jpg","smallWidth":460,"smallHeight":345,"bigWidth":728,"bigHeight":546,"licensing":"
\n<\/p>
\n<\/p><\/div>"}, {"smallUrl":"https:\/\/www.wikihow.com\/images\/thumb\/b\/b6\/Build-an-Aquarium-Stand-Step-5-Version-5.jpg\/v4-460px-Build-an-Aquarium-Stand-Step-5-Version-5.jpg","bigUrl":"\/images\/thumb\/b\/b6\/Build-an-Aquarium-Stand-Step-5-Version-5.jpg\/aid1391678-v4-728px-Build-an-Aquarium-Stand-Step-5-Version-5.jpg","smallWidth":460,"smallHeight":345,"bigWidth":728,"bigHeight":546,"licensing":"
\n<\/p>
\n<\/p><\/div>"}, {"smallUrl":"https:\/\/www.wikihow.com\/images\/thumb\/9\/9b\/Build-an-Aquarium-Stand-Step-6-Version-5.jpg\/v4-460px-Build-an-Aquarium-Stand-Step-6-Version-5.jpg","bigUrl":"\/images\/thumb\/9\/9b\/Build-an-Aquarium-Stand-Step-6-Version-5.jpg\/aid1391678-v4-728px-Build-an-Aquarium-Stand-Step-6-Version-5.jpg","smallWidth":460,"smallHeight":345,"bigWidth":728,"bigHeight":546,"licensing":"
\n<\/p>
\n<\/p><\/div>"}, {"smallUrl":"https:\/\/www.wikihow.com\/images\/thumb\/6\/6d\/Build-an-Aquarium-Stand-Step-7-Version-5.jpg\/v4-460px-Build-an-Aquarium-Stand-Step-7-Version-5.jpg","bigUrl":"\/images\/thumb\/6\/6d\/Build-an-Aquarium-Stand-Step-7-Version-5.jpg\/aid1391678-v4-728px-Build-an-Aquarium-Stand-Step-7-Version-5.jpg","smallWidth":460,"smallHeight":345,"bigWidth":728,"bigHeight":546,"licensing":"
\n<\/p>
\n<\/p><\/div>"}, {"smallUrl":"https:\/\/www.wikihow.com\/images\/thumb\/0\/0c\/Build-an-Aquarium-Stand-Step-8-Version-5.jpg\/v4-460px-Build-an-Aquarium-Stand-Step-8-Version-5.jpg","bigUrl":"\/images\/thumb\/0\/0c\/Build-an-Aquarium-Stand-Step-8-Version-5.jpg\/aid1391678-v4-728px-Build-an-Aquarium-Stand-Step-8-Version-5.jpg","smallWidth":460,"smallHeight":345,"bigWidth":728,"bigHeight":546,"licensing":"
\n<\/p>
\n<\/p><\/div>"}, {"smallUrl":"https:\/\/www.wikihow.com\/images\/thumb\/1\/1c\/Build-an-Aquarium-Stand-Step-9-Version-5.jpg\/v4-460px-Build-an-Aquarium-Stand-Step-9-Version-5.jpg","bigUrl":"\/images\/thumb\/1\/1c\/Build-an-Aquarium-Stand-Step-9-Version-5.jpg\/aid1391678-v4-728px-Build-an-Aquarium-Stand-Step-9-Version-5.jpg","smallWidth":460,"smallHeight":345,"bigWidth":728,"bigHeight":546,"licensing":"
\n<\/p>
\n<\/p><\/div>"}, {"smallUrl":"https:\/\/www.wikihow.com\/images\/thumb\/3\/34\/Build-an-Aquarium-Stand-Step-10-Version-5.jpg\/v4-460px-Build-an-Aquarium-Stand-Step-10-Version-5.jpg","bigUrl":"\/images\/thumb\/3\/34\/Build-an-Aquarium-Stand-Step-10-Version-5.jpg\/aid1391678-v4-728px-Build-an-Aquarium-Stand-Step-10-Version-5.jpg","smallWidth":460,"smallHeight":345,"bigWidth":728,"bigHeight":546,"licensing":"
\n<\/p>
\n<\/p><\/div>"}, {"smallUrl":"https:\/\/www.wikihow.com\/images\/thumb\/3\/39\/Build-an-Aquarium-Stand-Step-11.jpg\/v4-460px-Build-an-Aquarium-Stand-Step-11.jpg","bigUrl":"\/images\/thumb\/3\/39\/Build-an-Aquarium-Stand-Step-11.jpg\/aid1391678-v4-728px-Build-an-Aquarium-Stand-Step-11.jpg","smallWidth":460,"smallHeight":345,"bigWidth":728,"bigHeight":546,"licensing":"
\n<\/p>
\n<\/p><\/div>"}, {"smallUrl":"https:\/\/www.wikihow.com\/images\/thumb\/2\/29\/Build-an-Aquarium-Stand-Step-12.jpg\/v4-460px-Build-an-Aquarium-Stand-Step-12.jpg","bigUrl":"\/images\/thumb\/2\/29\/Build-an-Aquarium-Stand-Step-12.jpg\/aid1391678-v4-728px-Build-an-Aquarium-Stand-Step-12.jpg","smallWidth":460,"smallHeight":345,"bigWidth":728,"bigHeight":546,"licensing":"
Sitemap 8
55 gallon aquarium stand diy
주님 친정 큰오빠 칠순이라 친정에 갔다가 슬픈 소식을 들었습니다. 친정 큰오빠께서 혈액암인것 같다는데 큰오빠는 받아들이고 싶지않은지 정밀검사를 안받으셨는데 조카들이 90%는 확정인것 같다고 합니다. 큰오빠도 눈치를 체셨는지 주님께 기도하며 치유하시고 싶어 합니다. 큰 통증 없이 많이 안 아프게 그리고 치유 시켜주셔요. 우리주 그리스도의 이름으로 간절히 기도 드립니다 아멘!!
이덕희 말다님이 요청하신 기도입니다. 55 gallon aquarium stand diy
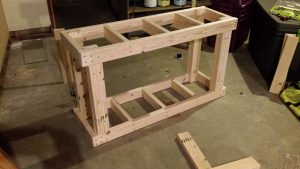
 The top of the stand is made with four pieces of 3/4" pine with 45 degree angles at each end, like a picture frame. Many aquarium enthusiasts build inexpensive stands from cinder blocks.
  The designer of my old aquarium stand knew exactly what he or she was doing. This is what I've been looking for.You are the answer to my "55 gallon fish tank dreams".Thank you. *. I allowed them to dry for about 6 hours before applying a second coat.
  There are no sheering forces involved, and the fatal side-to-side collapse is also avoided.Although this method takes more time than more common DIY stand construction methods, it uses the wood efficiently, looks more professional in my opinion and saves space on the inside of the stand. I made a jig that I could put a 2x4 in and run through the table saw, flip it over and run it through again. I happen to keep a 5-gallon bucket of white latex on hand, but a gallon of paint will run you $13-25, depending on brand and color. Hi,I'm 6'4" and I like my tanks higher in order to comfortably work in them. Lastly, have a plan for your electrical outlets and for tank maintenance. *. Instead of plywood I got a 16 board and cut that into 50in pieces. When you think its time to hire a new stand, don't employ one from the store. You can hang the door with european hinges designed for a flush mounted door. Avoid using a coarse or medium grit sandpaper to sand your stand, as these may actually do some damage to your wood. Even if the four legs could take the compression (8.3 lbs per gallon x 70 gallons = 581 lbs, plus glass, gravel & rock, then divided by 4 legs), you also have to address the risk that the stand collapses laterally, like a house of cards falls. Finally, lay your 2x8 wood planks over the top, aligning the edges. 1 year ago. It's fun to share. Expert Interview. Does adding a 4th cinder block (and possibly another shelf) cause any structural concerns? Okay, let's switch gears and explain how I built it.
  You may also want to use wood adhesive to ensure that the 2x4s are securely attached to each other.
  Je veut vous dire merci .la belle ide je l'ai fait tres beau resultat je suis bien content tres solide et beaucoup moins dispendieux que l'acheter dans une animalerie ou tout autre magasin de grande surface .encore merci de partager ta belle Ide.Andr du Canada. Rather than take punches at my old stand, which has seen better days, I'd rather use it to point out something to fish owners and the DIY stand builder. I have a stand that I built 35 years ago, and I didn't use a single 2x4. Leave everything else (i.e. There is also a wide-spread practice by manufacturers of not finishing the back of the stand because the designer probably expects you to always place the stand against the wall.But doctor's offices and Chinese restaurants put theirs out in the middle of the floor? So you obviously can't just plop an aquarium onto a spare rickety table and hope for the best. Try adding some 2 by 4 cross pieces to the part of the frame thats immediately under the fish tank, parallel to the short edges of the frame. I am about to build a stand for a new 75 gal tank, and will be incorporating some of your idees. In one of them, put all of the things which have to be unplugged when you do water changes (i.e. *. Now you will never forget to unplug something before a water change, or plug it back in when you are finished. Think about what faucet you will use for water changes and how you will access it, preferably without having to haul buckets of water back and forth across your house--I've been there and it ain't fun! It's not quite my style, but it is great to see something besides those horrible 2x4 stands that you see everywhere on the net. It's always good to learn from others. The two pieces are then biscuit joined and glued together so that you leave a 3/4" slot that is 3/4" deep from the lowest point.I used a circle cutting jig to create the large arcs in the outside layer of the bottom frame before gluing. By signing up you are agreeing to receive emails according to our privacy policy. You can even use press board to go cheaper; it just doesn't look quite as nice. But I've never been satisfied with the quality of aquarium stands sold in pet stores, and on top of that they can run you hundreds of dollars. All of the vertical pieces supporting the weight of the stand slide neatly into this channel. I especially liked seeing some of the details you added for both functionality and aesthetics. You might try leaning small weights against them to hold them in place. tank light, cabinet light) plugged into the other strip. What if I want to have my tank away from the wall?
  Yes, I have thought about this but haven't seriously pursued it. Of course, you place the mounting screws to match your power supplies and other equipment. Make sure the 4 smaller 2x4s (which will serve as cross braces for the frame) are set at equal distances apart from each other. Cinder blocks bear weight best when you stack them with the holes facing vertically (so the holes will be hidden once your stand is assembled). Mine wasnt designed for a sump. Yes it will work. You can add the 1/4" thick, 3/4" wide vertical accent trim now to hide the seams. This plan does not have that, but you could include it in one of the panels at the back. I have spent the last three days. I just don't want to buy a full sheet of plywood when all I need is 50". It looks great. After 15 years of much-appreciated service in holding up 750 pounds of a combination of glass, rock, electrical equipment, water and the variety of fish and aquatic plants that give me peace, it was time to accept the resignation of my old, particle board aquarium stand.And rather than go to the store to hire a new one, this time I would make my own. Allow the wood glue to dry for at least 2 hours before moving forward. I painted several layers of spray paint. It turned out great. Merriam-Websters defines "innovation" as "the act or process of introducing new ideas, devices or methods." Yes with my setup everything is diverted through that one opening on the back left. The microswitch goes between the 12V power supply and the LEDs, and interrupts just the positive wire. You saved my time Aspen )) I'm looking for a good aquarium stand solution for my piranhas whole month. 2 months ago. I just acquired a 6 foot tank that holds over 100 gallons, and have been fretting over what to use as a stand. I wish I had the expertise to help you out. Make sure your stand will be sturdy enough to support the filled tank. Does everything get routed through that one small opening on the back left? I have a 40 gallon fish tank to rehome my two red eared slider turtles.